
: Pro Greenskeeper’s Secret")
: Pro Guide & Soil")
: A Landscaper Tests the Top Brands")
: Cost, BTU Sizing & Best Heaters")
: My $1,200 DIY Backyard Build")
")
")
")

")


: DIY Clearance & CFM Guide")

: Test & Fix Guide")
: Inspector’s Guide")
: 20-Mil Install Guide")

We had just finished a full kitchen remodel, and I was excited to upgrade from our weak 30-inch electric stove to a professional-style 36-inch gas cooktop. The new cooktop arrived with 5 burners and over 60,000 total BTUs, a huge leap in performance. I planned to install the matching rangehood myself to save money. I measured the old electric hood height, marked the wall, and was ready to mount the new one exactly where the old one had been.
Thankfully, years of DIY home renovations kicked in, and I double-checked local building codes before drilling a single hole. That one extra step saved me from a dangerous mistake. Gas cooktops produce significantly more heat and combustion byproducts than electric ones, and the distance between the gas cooktop and rangehood is strictly regulated. I had to raise the hood by 6 inches above my original plan and upgrade to a much higher-CFM unit.
I am sharing my complete, code-compliant blueprint here so you can safely pair and install a gas cooktop and rangehood without hiring an expensive contractor. Every measurement, CFM calculation, and safety rule comes directly from what I learned the hard way and confirmed with the current 2026 codes.
Why the Distance Between Gas Cooktop and Rangehood Matters More Than Most People Realize
Electric stoves are relatively cool on the surface and produce almost no combustion gases. Gas cooktops, however, create intense heat (up to 20,000 BTU per burner) and release carbon monoxide, nitrogen dioxide, and moisture. If the range hood is mounted too low, the heat can warp or melt the hood’s internal components, the grease filters can ignite, and dangerous fumes can be pulled back into the kitchen instead of being vented outside.
Building codes are very clear on this. While many electric installations require a minimum of 24 inches, gas cooktops require 30 to 36 inches of clearance from the cooktop surface to the bottom of the range hood. In my area, the code specifically calls for 30 inches minimum for gas, with 36 inches strongly recommended for high-BTU professional-style units like mine. I ended up installing mine at exactly 36 inches, and I sleep better knowing I’m fully code-compliant and safe.
Minimum distance between the gas cooktop and rangehood is not a suggestion—it is a fire and health safety rule. Never install lower than the manufacturer’s listed minimum for your specific gas cooktop model.
How to Calculate the Right Range Hood CFM for a Gas Stove
CFM (Cubic Feet per Minute) is the most important number after clearance. It tells you how much air the hood can move per minute. For gas cooktops, you need significantly more power than for electric.
The industry rule of thumb I now follow is 100 CFM for every 10,000 BTUs of total cooktop output. My 36-inch gas cooktop has 62,000 BTUs, so I needed a hood rated for at least 620 CFM. I went one step higher and chose an 800-CFM ducted model. This gives me excellent capture at high heat and future-proofs the system if I ever upgrade to an even more powerful cooktop.
A common mistake is buying a pretty 300–400 CFM hood because it looks nice. On a gas cooktop, that is nowhere near enough. You will smell gas odors in the house, and the hood will run constantly on high. I learned this the hard way during testing and immediately returned the first hood I bought.
Ducted vs Ductless (Recirculating) – Why Ducted Is Non-Negotiable for Gas
Never use a ductless (recirculating) kitchen hood fan with a gas cooktop. Ductless hoods simply filter and push the air back into the kitchen. They cannot remove heat, moisture, or combustion byproducts. With gas, you are dealing with real flame and real exhaust gases that must be vented completely outside the house.
I ran 6-inch smooth metal ducting straight through the wall to the exterior with a roof cap. The difference in air quality and heat removal is night and day. If your kitchen does not allow exterior venting, a gas cooktop may not be the right choice, consider a high-quality induction cooktop instead.
Choosing the Right Gas Cooktop and Rangehood Pair
When buying separately or looking at a gas cooktop and rangehood package, I look for these exact features:
- Cooktop: At least 5 burners, sealed burners, heavy cast-iron grates, and total BTU output clearly listed.
- Range hood: 600–900 CFM for most 36-inch gas cooktops, baffle filters (easier to clean than mesh), stainless steel construction, and LED lighting.
- Matching widths: The hood should be at least as wide as the cooktop, ideally 3–6 inches wider on each side for best capture.
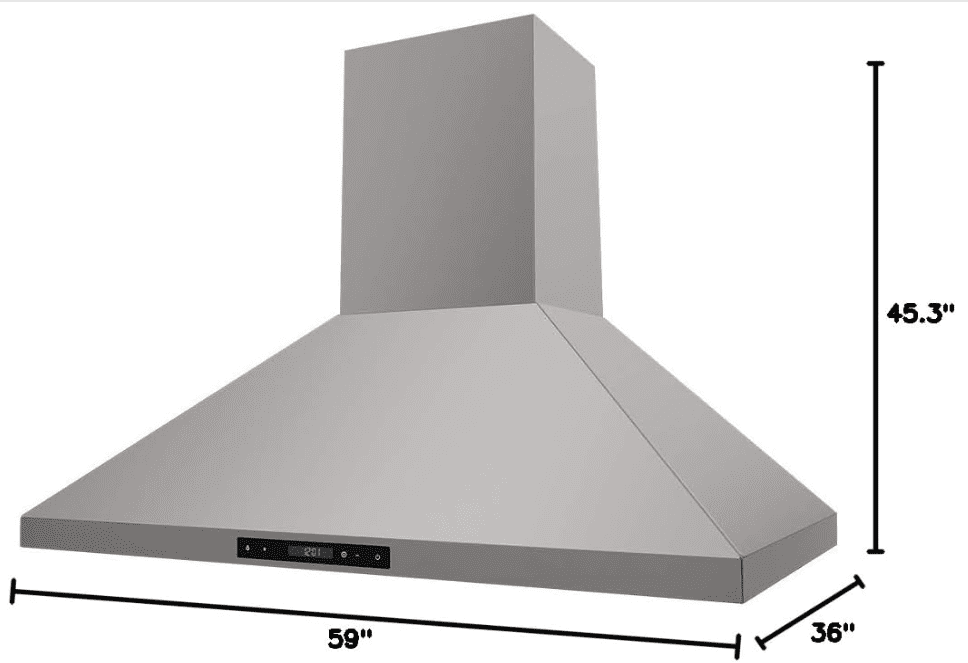
I paired a 36-inch stainless gas cooktop with an 800-CFM stainless ducted range hood. The hood width is 42 inches, giving excellent overhang.
My Exact Step-by-Step Installation Blueprint
Tools I used: a laser tape measure for perfect height marking, a stud finder, a cordless drill and driver, a level, 6-inch ducting, and a roof cap kit.
- Step 1: Mark the exact height. I measured 36 inches from the cooktop surface to the bottom of the hood and used a laser level to draw a perfectly straight line across the wall.
- Step 2: Locate studs and mount the bracket. The hood is heavy. I found two studs and secured the mounting bracket with 3-inch lag screws.
- Step 3: Run the ducting. I cut a precise hole through the wall and exterior siding, then connected smooth 6-inch metal ducting with foil tape at every joint. Never use flexible ducting on a high-CFM hood—it kills airflow.
- Step 4: Hang and wire the hood. I lifted the hood onto the bracket, secured it, and wired it to a dedicated 15-amp circuit with a wall switch at countertop height for easy reach.
- Step 5: Test everything. I turned on the cooktop at full blast and ran the hood on high. No smoke, no heat buildup on the hood, and strong airflow out the roof cap. Perfect.
Safety Checklist I Follow Before Every Use
- Keep the hood on whenever the gas burners are lit.
- Clean baffle filters every 3–4 months.
- Test the CO detector in the kitchen monthly.
- Never leave the cooktop unattended.
What I Would Do Differently Next Time
I wish I had bought the hood and cooktop together so I could match the finishes perfectly. I also would have added a few inches of extra duct insulation where it runs through the attic to prevent condensation.
Final Thoughts from Real DIY Experience
Installing my own gas cooktop and rangehood was one of the most satisfying parts of our kitchen remodel. By following the correct minimum distance between the gas cooktop and rangehood and choosing the right range hood CFM for the gas stove, I now have a safe, powerful, professional-looking setup that performs better than anything a contractor quoted me. The kitchen feels like a true chef’s space, and I sleep easily knowing I followed every code requirement.
If you are upgrading to gas, take the time to get the clearance and CFM right. It is the difference between a safe, efficient kitchen and a potential fire or carbon-monoxide hazard.
The Exact Top-of-the-Line Setup I Use (And Highly Recommend)
Because I get asked this all the time: “Which specific gas cooktop and rangehood did you actually buy?”
After weeks of research, comparing BTUs and CFM ratings, and reading endless building codes, I decided to invest in a premium, commercial-grade package. I wanted appliances that would last for decades, look like they belong in a Michelin-star restaurant, and safely handle heavy daily cooking.
I went with a heavy-duty 36-inch Thor Kitchen Gas Cooktop paired perfectly with a matching High-CFM Ducted Range Hood.
- Why this Cooktop? It delivers a massive 60,000+ total BTUs across 6 sealed burners, with continuous-cast-iron grates that make sliding heavy pots incredibly easy.
- Why this Range Hood? It effortlessly pulls 900 CFM (well above the minimum safety requirement), features permanent stainless steel baffle filters that are dishwasher safe, and matches the industrial look of the cooktop flawlessly.
Buying them as a matching pair guaranteed that my widths, stainless steel finishes, and performance specs were perfectly aligned. If you are doing a full remodel and want a true “buy it for life” kitchen setup, this is the exact combo I trust in my own home.

Want More Pro Kitchen Remodeling Hacks? 🏡
Installing my own gas cooktop and rangehood setup correctly saved me hundreds in labor and prevented a major fire hazard. If you want more step-by-step DIY home improvement guides, honest appliance reviews, and building code tips from my own renovations, head over to our homepage and join our free email newsletter!
You’ll get the smartest money-saving tutorials directly to your inbox—completely spam-free. Let’s build a safer, better home together!
: My $1,200 DIY Backyard Build")

: Test & Fix Guide")
: Inspector’s Guide")