
: Pro Greenskeeper’s Secret")
: Pro Guide & Soil")
: A Landscaper Tests the Top Brands")
: Cost, BTU Sizing & Best Heaters")
: My $1,200 DIY Backyard Build")
")
")
")

")


: Test & Fix Guide")
: Inspector’s Guide")
: 20-Mil Install Guide")
: Repair Cost & Who to Call")

We had just finished a big swimming pool upgrade in the backyard, and every time the kids came out of the water, or I finished mowing, we tracked grass and chlorine straight into the house. My wife and I agreed an outdoor shower would solve everything, providing quick rinse-offs after swimming, yard work, or even a quick cool-down on hot summer days. I called three local contractors for quotes. The lowest number I got was $3,200 for a basic cedar enclosure with plumbing. That price included labor, permits, and “custom work.”
I have years of DIY home and landscaping projects under my belt—from building decks to installing French drains, so I knew there had to be a smarter way. I decided to tackle it myself using a pre-cut outdoor shower enclosure kit and a direct-plumb outdoor shower kit. By doing the work myself, I finished the entire project in one long weekend, got exactly the look and size I wanted, and made sure the drainage was perfect so water never threatened my home’s foundation. I am sharing my exact step-by-step DIY blueprint here so other homeowners can build their own luxury outdoor shower without the massive contractor markup.
The Contractor Trap: Why Pre-Cut Outdoor Shower Kits Are the Only Smart Choice
Most contractors quote a full custom build because that is how they make the most money. They have to design, cut lumber on-site, frame everything, run new plumbing lines, and handle permits. That labor adds up fast.
Pre-cut outdoor shower kits (especially the popular Cape Cod style) change the game completely. These kits come with all the panels, posts, roof, and hardware already cut and pre-drilled. You simply assemble them like a big Lego set. No complicated carpentry, no waste, and no weeks of waiting. A good cedar outdoor shower enclosure kit costs between $600 and $1,200, depending on size and features, and a complete plumbing kit (showerhead, mixing valve, and hose connections) runs another $150–$300. Total materials for my project came in under $1,000, saving more than $2,000 compared with the contractor’s quotes.
The kits are also designed by people who understand real-world use. They include proper ventilation, easy-access doors, and built-in benches in many models. I chose a classic Cape Cod style because it matched our house and gave us a private, enclosed feel without feeling like a cheap plastic box.
Choosing the Right Outdoor Shower Kit for Your Yard
There are three main types I considered:
- Cedar outdoor shower enclosure kits: Traditional look, naturally rot-resistant, beautiful weathering over time.
- Vinyl or composite outdoor shower kits: Zero maintenance, never need staining, but a less “premium” feel.
- RV outdoor shower kits: Portable, hose-only setups perfect for campers or temporary use, but I wanted something permanent and fully plumbed.
I went with a 4 ft × 6 ft cedar Cape Cod outdoor shower kit style because it gave me room for a bench and hooks while still fitting nicely beside the pool. The kit included everything except the plumbing fixtures and drainage system.

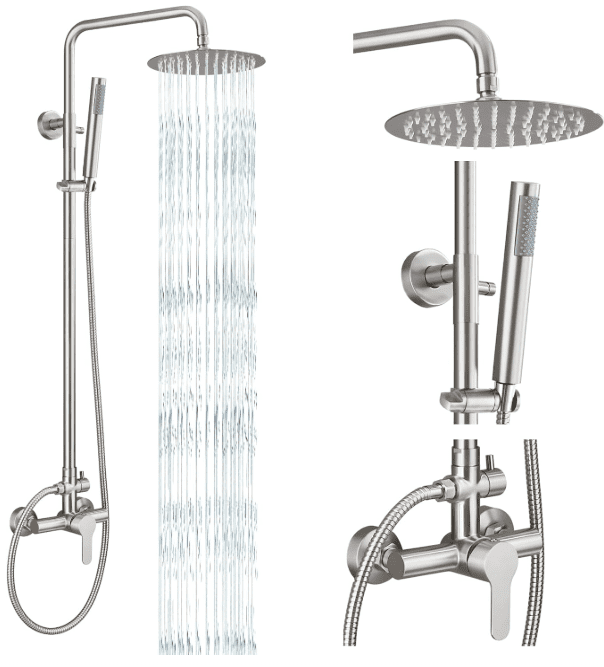
Plumbing the Outdoor Shower Kit—Simple and Safe
Plumbing an outdoor shower kit is much easier than most people think. You have three realistic options depending on your existing setup:
- Connect to an existing outdoor spigot: The simplest route. I had a frost-proof spigot near the pool. I ran a short PEX line from the spigot to the mixing valve inside the enclosure.
- Run new PEX lines from the house: If you want hot and cold water, tie into an interior valve or manifold. PEX is flexible, freeze-resistant, and easy to work with.
- Garden hose setup: Perfect for a budget or temporary RV outdoor shower kit. Many kits come with quick-connect hose fittings.
I chose option 1 with a hot/cold mixing valve so we could have warm water on cooler evenings. The entire plumbing run was less than 12 feet and took me about 90 minutes. I used ½-inch PEX with shark-bite fittings, so I didn’t need any soldering or special tools.
Important safety note: Always install a vacuum breaker or backflow preventer on the water supply line. This keeps pool chemicals or soap from ever flowing back into your home’s drinking water.
Assembling the Outdoor Shower Enclosure Kit
The enclosure kit arrived in two large boxes, with clear instructions and labeled parts. Assembly was straightforward:
- Level the ground where the shower will sit (I used a 4-foot level and a gravel base).
- Set the four corner posts into the pre-cut base plates and secure with the included stainless-steel screws.
- Attach the side and back panels—they slide into grooves and lock with clips.
- Install the roof (mine had a sloped design for rain runoff) and any bench or shelf brackets.
- Hang the door on the heavy-duty hinges and adjust for smooth operation.
Cedar panels come pre-stained or natural. I chose pre-stained “weathered gray” so it matched our fence immediately. Total assembly time for two people: about three hours.
⚠️ The Most Important Step: Perfect Drainage to Protect Your Foundation
This is where most DIYers (and even some contractors) make expensive mistakes. Water pooling next to your house foundation can lead to basement leaks, mold, and structural issues. I refused to take any chances.
I built a simple but highly effective dry well / French drain system directly under the shower floor:
- Dig a 3 ft × 3 ft × 18-inch deep pit where the shower floor will sit.
- Line the entire hole with landscape fabric to keep soil from mixing with the gravel.
- Add a 4-inch perforated drain pipe in the bottom that slopes away from the house and daylights about 10 feet out in the yard.
- Fill the pit with ¾-inch washed drainage gravel to within 4 inches of the top.
- Place the shower floor grate (included with most kits) directly on top of the gravel.
This system handles heavy use without any standing water. The gravel acts as a natural filter, and the perforated pipe carries excess water far away from the foundation.
Final Setup, Testing, and Finishing Touches
Once the enclosure and drainage were complete, I mounted the showerhead and mixing valve at a comfortable height (about 7 feet for adults, with a handheld wand for kids). I added a small shelf for soap and shampoo, a towel hook, and a non-slip mat on the grate.
Testing was simple: I turned on the water, checked for leaks at every connection, and made sure the drainage worked perfectly. The whole system has now been through two full summers of daily use with zero issues.
Real Costs and Time Breakdown (2026 Numbers)
Watch My 1-Minute Cost Breakdown 🎥
- Cedar outdoor shower enclosure kit: $850
- Plumbing kit with mixing valve and showerhead: $220
- Gravel, fabric, and drain pipe: $140
- My time: One weekend (about 14 hours total)
Total out-of-pocket: $1,210. Compare that with the $3,200+ contractor quotes, and you can see why I am such a believer in these kits.
Common Mistakes to Avoid
- Skipping proper drainage: This is the #1 reason outdoor showers cause foundation problems.
- Not leveling the base: Crooked enclosures leak and look terrible.
- Using cheap hose-only plumbing for a permanent install: It fails quickly in sun and weather.
- Forgetting the vacuum breaker: Never risk backflow into your home water supply.
Want More DIY Backyard Blueprints? 🏡
Building our outdoor shower with a pre-cut kit saved us over $2,000 and completely upgraded our backyard. If you want more step-by-step DIY landscaping guides and home improvement tricks from my own projects, head over to our homepage and join our free email newsletter!
You’ll get the best money-saving tutorials and exclusive gear reviews—completely spam-free. Let’s build a better yard together!


: Test & Fix Guide")
: Inspector’s Guide")
: Pro Greenskeeper’s Secret")